Scheduled sending lets you prepare an invoice now and have ATB Invoicing send it automatically at a date and time you choose. Follow the steps below to schedule, change, or cancel a send.
Before you begin
You will need:
- A draft invoice. Only drafts can be scheduled, and scheduling is not available for quotes.
- A customer with an email address or phone number on file.
- At least one payment option attached to the invoice.
- The Create and manage invoices permission.
If you have not created the invoice yet, see Create a draft invoice.
Step 1: Choose a send date and time
You can schedule from the invoice builder or from a saved draft.
While creating or editing the draft
- In the invoice builder, find the Scheduled send card.
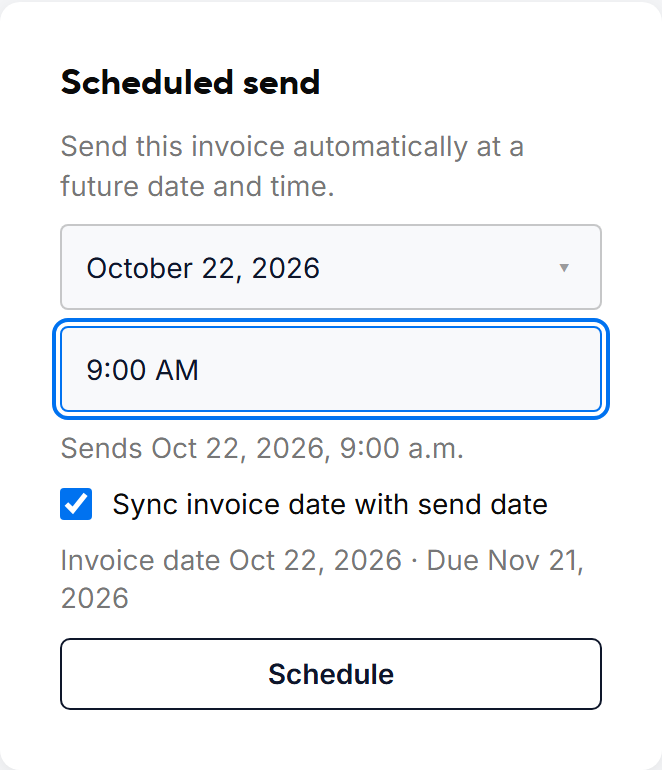
- Pick a date, then a time.
- Save the invoice as usual.
From a saved draft
- Open the draft invoice.
- In the Scheduled send card, pick a date, then a time.
- Click Schedule.
A message confirms the invoice will send automatically and shows the date and time.
Times are offered in 5-minute steps and must be at least 5 minutes from now. The invoice goes out within a few minutes of the time you chose.
Note. If the Scheduled send card says to add a phone number or email address, the customer has no contact details on file. Edit the customer first. See Editing customer details.
Step 2: Decide whether the invoice date follows the send date
Under the time, the Sync invoice date with send date checkbox controls the invoice date:
- Selected — the invoice date changes to the send date. The due date moves by the same number of days, so your payment terms stay the same. The card shows the new dates.
- Cleared — the invoice keeps the dates you entered.
Your organization's default is the Set invoice date to the send date setting in Default Settings. See Managing organization settings.
Step 3: Track the scheduled invoice
A scheduled invoice shows the status Scheduled. It is still a draft underneath, so it does not count toward your outstanding balance until it is sent.
- On the Invoices page, filter by Scheduled to see every queued invoice.
- On the invoice, the Scheduled send card shows Scheduled to send on with the date and time.
When the time arrives, ATB Invoicing sends the invoice by email and by text message to every contact detail on file. The status changes to Sent, and you get a notification that the invoice was sent.
Tip. If Interac e-Transfer is attached, ATB Invoicing prepares the payment request when you schedule. If the request cannot be created, the schedule is not saved and a message explains why.
Step 4: Change, send now, or cancel
- Change the time. Open the invoice, click Edit invoice, and update the Scheduled send card.
- Send now. Open the invoice and click Send invoice. Sending now delivers it immediately and cancels the scheduled send.
- Cancel. Open the invoice and click Cancel schedule in the Scheduled send card. On the Invoices page, you can also open the row's actions menu and choose Cancel send. The invoice returns to Draft.
Common issues
My scheduled invoice did not send
You get a notification and an email that the invoice did not send. The invoice stays a draft. If the customer has no contact details or the invoice has no payment option, the schedule is cancelled. Fix the problem, then schedule it again or send it yourself.
The Scheduled send card is missing
The invoice is no longer a draft. Only drafts can be scheduled.